

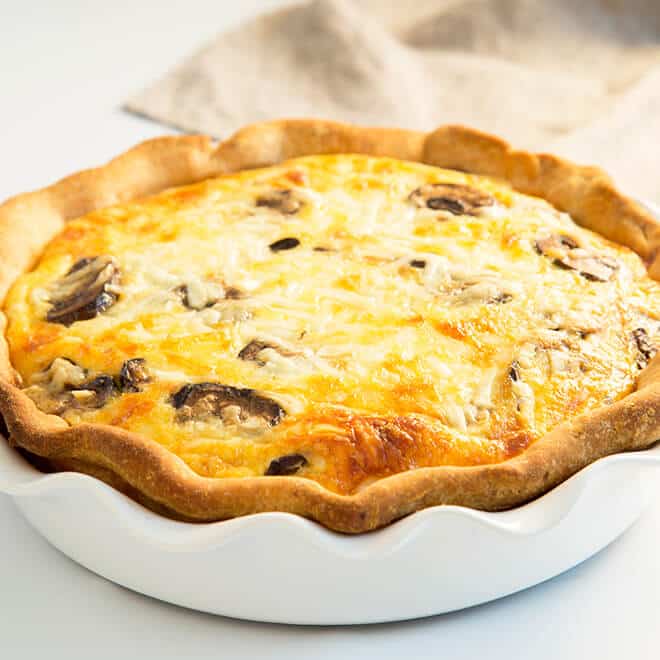
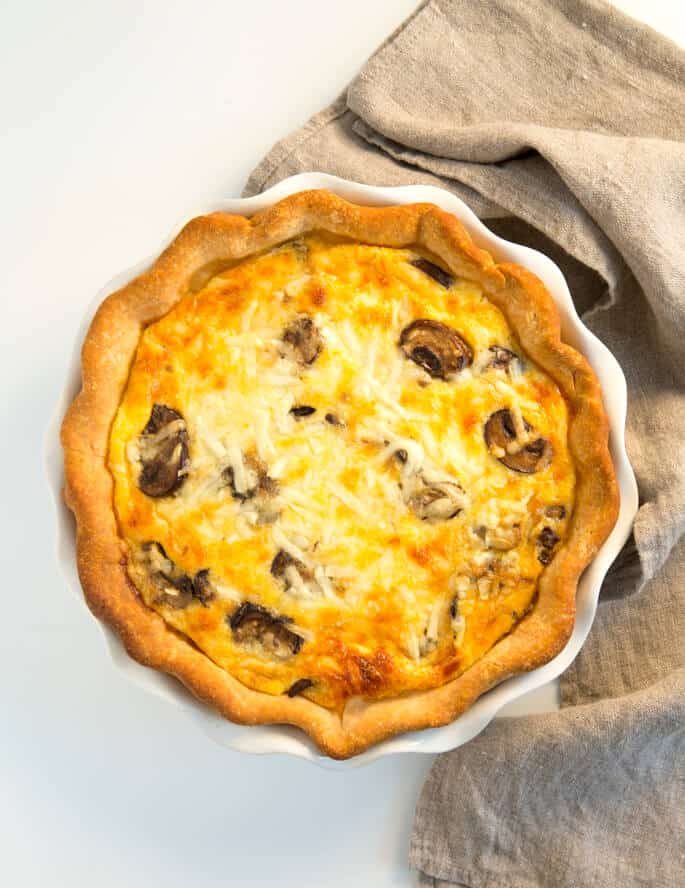
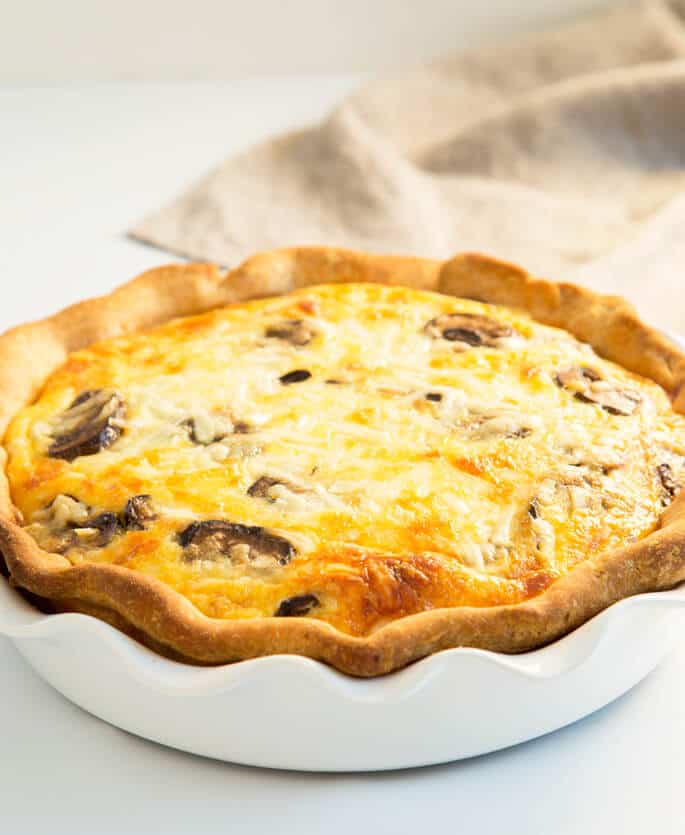
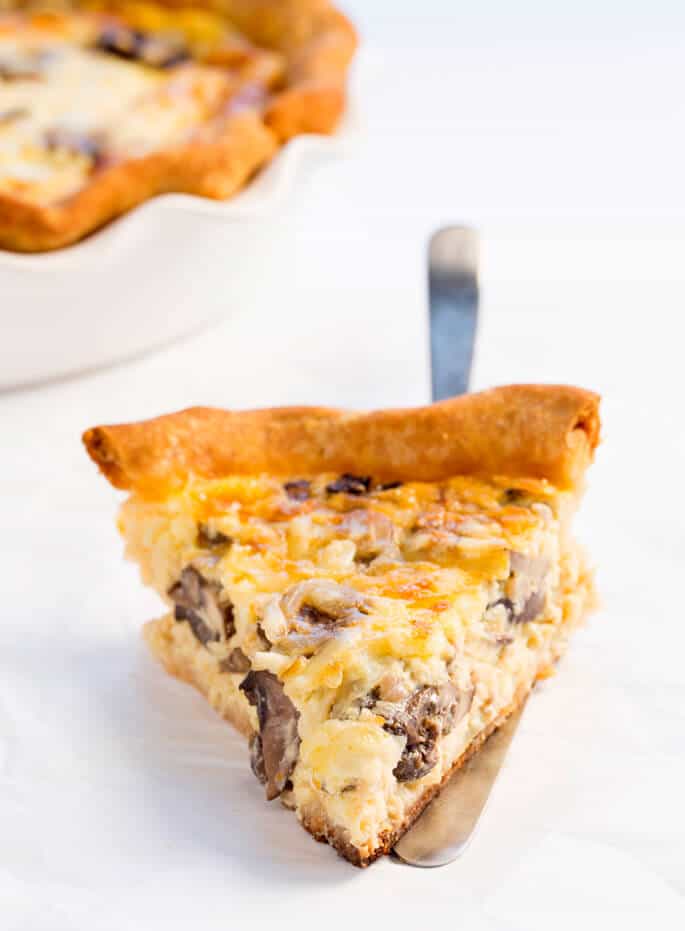
This gluten free quiche is made with a creamy, savory egg custard and vegetable filling, baked to perfection in a lightweight and flaky gf pastry crust.
The key to creating the proper gluten free quiche is a lightweight and flaky crust (or go crustless!), and a creamy egg custard filling. With the precise ratio of eggs to exploit, you will make the proper quiche each time!
What makes this recipe for gluten free quiche so good
Whether or not you name it a gluten free breakfast for dinner, brunch or only a beautiful French-style breakfast, mastering the artwork of the proper gluten free quiche will are available very useful certainly. There’s not loads you should know, however no matter I do know, I’ve detailed proper right here.
Essentially the most beautiful quiches begin with a lightweight and flaky pie crust. I’ve two favourite pie crust recipes right here on the weblog: my normal gluten free pie crust (with a how-to video!), and my additional flaky bitter cream gluten free pie crust. You may want a half-recipe of both one, since we’re solely making a single crust.
What’s within the filling of this delicate, savory quiche?
I’ve made this quiche with a mushroom and cheese filling, since it is a traditional, beautiful mixture. The important thing to any correct quiche filling, although, is within the ratio of eggs to exploit or cream (see under)—and within the absence of an excessive amount of moisture within the remaining filling.
In the event you’re utilizing mushrooms as I’ve, you should cook dinner down the mushrooms in order that they launch their moisture, after which go away the moisture behind. If utilizing a blanched vegetable (frozen broccoli and/or cauliflower work superbly), remember to blot it dry earlier than including it to the filling. Failure to heed these moisture warnings will lead to a tragic, soggy quiche that by no means fairly units up!
Learn how to make gluten free quiche
There are two essential components to any quiche: the crust, and the filling. The crust is mild, flaky and buttery. The filling is easy, creamy, wealthy with milk and cheese with some texture from frivolously sauteed greens.
A single gluten free pie crust recipe
To make a quiche, you want a single 10-inch pie crust. A superb pie crust is made with very chilly butter and water, plus all function gluten free flour, baking powder, and salt.
Pie crust, like all pastry, is a mixture of flour and water, and chilly layers or chunks of fats, like butter. When the chilly butter is surrounded by flour and water, it’s going to increase and push out the dough and create flaky, crispy layers of pastry.
Right here, we form the pie crust, chill it to make sure it is very chilly earlier than it goes within the oven, then bake it half manner with none filling. That is referred to as parbaking, and it is the rationale that the crust stays mild and flaky even after we add the moisture of the filling.
To parbake a formed and chilled pie crust in a pie plate, pierce the formed pie crust to make sure that it does not bubble within the oven. Line the crust with a bit of parchment paper, and weigh it down with some dried beans or ceramic pie weights.
Bake the lined and weighted pie crust at 425°F for about quarter-hour or till it is starting to brown.
The 4 essential quiche filling elements
As soon as you have baked the crust, set it apart to chill a bit. It is time to put together the filling. The correct quiche filling is a straightforward ratio or formulation, very similar to a cheesecake filling is made from eggs, granulated sugar, and cream cheese.
A quiche filling has solely 4 essential elements in correct proportion, every associated to what number of eggs are within the filling. For every egg in your quiche filling, you will want:
- 1/4 cup (2 fluid ounces) milk or 1/3 cup (2 2/3 fluid ounces) half-and-half;
- 1/2 cup not-too-wet cooked (or at the least blanched) vegetable; and
- 2 ounces semi-hard cheese, grated.
The greens are cooked in some type of butter or oil simply till they’re tender. In the event you do not saute the greens, they’re going to be too laborious, particularly as in comparison with the remainder of the egg, milk and cheese filling.
Plus, cooking the greens first signifies that they are going to launch at the least a few of their moisture, which may then be drained or cooked off. In the event you do not cook dinner the greens a bit earlier than baking them within the filling, you will have a watery quiche.
Assembling the quiche
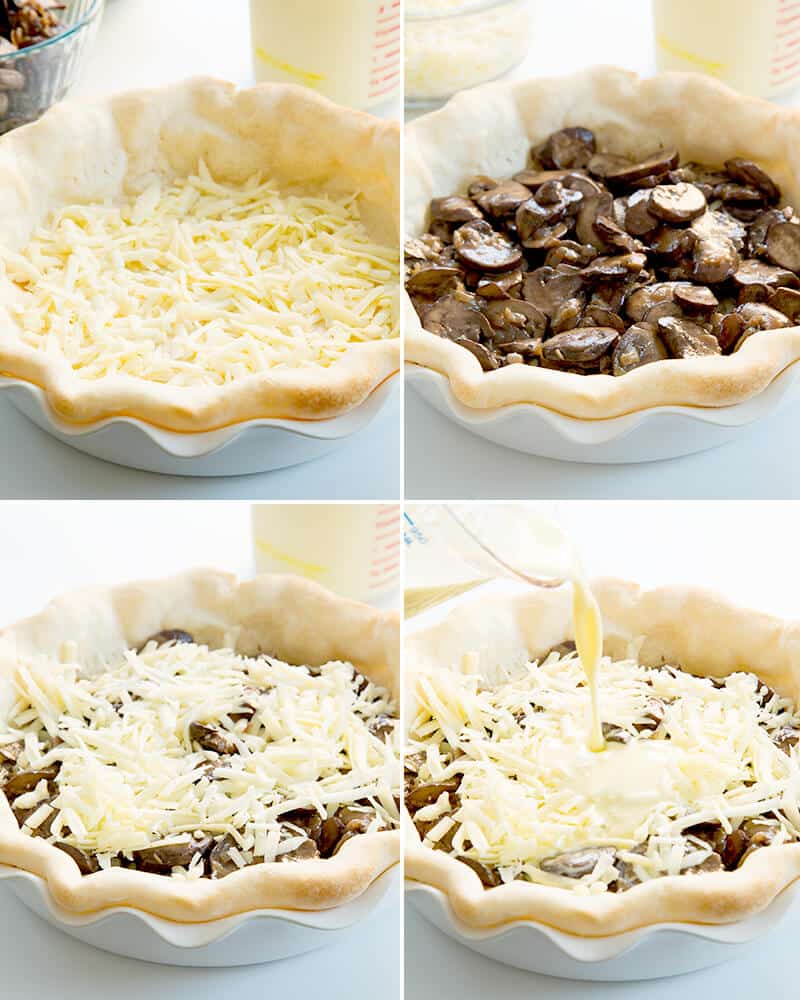
As soon as the crust is parbaked and the greens are cooked, it is time to assemble the quiche. First, place half of the grated cheese on prime of the parbaked crust. High with the cooked greens, adopted by the remaining cheese.
Beat the eggs with the half and half or milk till well-combined, and pour that combination on prime of the greens and cheese.
Though we parbake the crust at 425°F, we’ll scale back the oven temperature to 350°F to bake the filling and end the quiche. It is carried out when the filling is ready, and the perimeters of the crust are golden brown. Let the quiche sit till the filling is ready, then slice and serve.
FAQs
A quiche made and not using a crust is normally gluten free, so long as there are not any gluten-containing fillers or grains within the filling. A crusted quiche will all the time have gluten except it is made particularly to be gluten free, since standard pie crust is made with wheat flour.
Quiche filling is finished baking when it’s frivolously golden brown on prime, with only a tiny little bit of jiggle within the middle when moved back and forth. It should proceed to cook dinner a bit even after it’s faraway from the oven, because it cools.
In the event you do not parbake the pie crust, it’s going to in all probability be soggy after the filling is cooked in it. Plus, the filling can be overcooked by the point the pie crust browns totally.
Sure, should you use uncooked greens in your quiche, they are going to launch their moisture throughout baking, resulting in a watery filling, and they are going to be crunchy in an in any other case easy and creamy filling.
Did you cook dinner your greens first by sauteeing them, and drain or cook dinner off the moisture earlier than including them to the filling? Did you employ an excessive amount of milk in your filling, or just not cook dinner it for lengthy sufficient in order that it was totally set?
As soon as your totally baked and ready quiche is totally cool, you may freeze the entire quiche or particular person slices. To freeze the entire quiche, I like to recommend slicing it into wedges after which wrapping the entire quiche in a tight-fitting freezer-safe wrap and freeze for as much as 3 months. To freeze particular person slices, wrap them tightly in freezer-safe wrap and freeze for as much as 3 months.
Sure, you may observe the directions for freezing the entire quiche simply above, or you can also make and/or parbake solely the pie crust first, then add and bake the filling later. The ready pie crust may be frozen as uncooked or baked, then baked or defrosted earlier than filling and continuing with the recipe as written.
Sure! You can also make a quiche completely crustless. Merely skip the elements and directions that relate to the crust, and bake the filling proper there in a greased pie plate. The baking time for the filling is not going to differ.
Sure! Mushrooms may be changed with 10 ounces broccoli or cauliflower florets, blanched and blotted dry, or 1 pound frozen reduce spinach, thawed and drained of most of its moisture.
Gluten free quiche elements and substitution strategies
Dairy free quiche
The dairy on this recipe comes from butter and grated cheese. You’ll be able to attempt changing the butter within the pie crust with vegan butter. Soften and Miyoko’s Kitchen manufacturers are one of the best.
For the grated cheese, you need to use your favourite nondairy cheese, however be certain you are utilizing one thing that melts and does not have a ton of moisture. Violife model nondairy cheese blocks are wonderful, however Daiya is normally fairly good, too.
Eggs
I’ve not tried to make this recipe with an egg replacer, however I’d not suggest attempting any substitute that you’d usually use for eggs after they’re not the first ingredient, like in baking a cake. You could possibly make this quiche with a overwhelmed egg substitute like “Simply Egg,” however I have never tried so I do not understand how effectively it bakes, particularly in a custard like quiche filling.
Learn how to serve this gluten free quiche
Everybody in my household cheers for a quiche, and it is even the stuff of birthday dinner requests round right here. Serve it with a pleasant inexperienced salad, and you have got a meal to recollect, elegant in its scrumptious simplicity.
The right gluten free quiche recipe
Good Gluten Free Quiche
This gluten free quiche is made with a creamy, savory egg custard and vegetable filling, baked to perfection in a lightweight and flaky gf pastry crust.
Yield: 8 slices
Stop your display from going darkish
Elements
For the pie crust (See Recipe Notes for various recipe.)
- 2 cups (280 g) all function gluten free flour mix (I used Higher Batter; please click on via for full data on applicable blends), plus extra for sprinkling
- 1 teaspoon xanthan gum (omit in case your mix already accommodates it)
- ⅓ teaspoon baking powder
- ⅓ teaspoon kosher salt
- 8 tablespoons (112 g) unsalted butter diced and chilled (a 1/2-inch cube is finest)
- ½ cup (4 fluid ounces) chilly water iced (ice does not rely in quantity measurement), plus extra as crucial
For the filling
- 2 tablespoons (28 g) unsalted butter
- 1 tablespoon (14 g) additional virgin olive oil
- 1 small yellow onion peeled and diced
- 1 pound (16 ounces) white or child portabello mushrooms sliced
- ½ teaspoon kosher salt
- ⅛ teaspoon freshly floor black pepper
- 4 (200 g (weighed out of shell)) eggs at room temperature
- 1 ⅓ cups (10.66 fluid ounces) half and half at room temperature (See Recipe Notes for various.)
- 8 ounces Gruyère cheese grated (options are one other semi-hard cheese, like Asiago, Jarlsberg or sharp white cheddar)
Directions
Put together the pie crust.
-
In a big bowl, place the flour, xanthan gum, baking powder, and salt, and whisk to mix effectively.
-
Add the chopped and chilled butter, and toss to coat it within the dry elements. Flatten every chunk of butter between your thumb and forefinger in order that it’s about 1/8-inch thick.
-
Create a effectively within the middle of the dry elements and slowly add the water (reserving the ice cubes), mixing gently till the dough begins to come back collectively.
-
With floured arms, press collectively the dough right into a disk. If there are any crumbly, dry spots at this level, add extra water by the teaspoonful and press collectively together with your arms.
-
Flip the dough out onto a frivolously floured floor.
-
Sprinkle the highest frivolously with extra flour, and roll out right into a tough rectangle that’s about 1 inch thick. Sprinkle the dough frivolously with extra flour, fold it over on itself in thirds such as you would a enterprise letter, sprinkle once more with flour, and roll out the dough as soon as once more right into a rectangle about 1 inch thick.
-
Repeat the method of rolling, sprinkling and folding at the least as soon as extra, this time ending with a rectangle about 1/2-inch thick.
-
Roll the dough in thirds as soon as extra, and wrap it securely in plastic wrap.
-
Place within the fridge to relax till agency (half-hour to an hour).
Form the pie crust.
-
Grease a 9-inch deep dish pie plate and set it apart.
-
Take away the pie dough from the fridge. Place it on a frivolously floured piece of unbleached parchment paper, mud frivolously with flour, and roll into an 10-inch spherical, about 3/8-inch thick.
-
Roll the pie crust loosely on the rolling pin after which unroll it over the ready pie plate.
-
Press the pie crust gently into the underside and up the perimeters of the pie plate and, with kitchen shears, trim the crust in order that only one/4-inch of extra is overhanging the plate.
-
Tuck the 1/4-inch of extra below itself, and crimp the sting gently all the way in which across the crust. Pierce the underside of the pie crust with the tines of a fork.
-
Preheat your oven to 425°F.
-
Place the pie plate within the freezer to relax for 10 minutes.
Par-bake the empty pie shell.
-
Take away the pie plate from the freezer and place a big piece of unbleached parchment paper within the middle of the crust. Place pie weights or dried beans in a single layer within the middle of the pie crust, on prime of the paper.
-
Place the pie plate within the middle of the preheated 425°F oven. Bake for quarter-hour or till simply starting to brown on the underside and edges.
-
Take away the pie plate from the oven and take away the paper and pie weights.
-
Scale back the oven temperature to 350°F.
Put together the filling.
-
In a medium sauté pan over medium warmth, place the butter and oil. As soon as the butter has melted, add the onion and cook dinner for a minute, stirring steadily.
-
Add the mushrooms, salt and pepper, and cook dinner, stirring steadily, till the mushrooms are browned and the pan has little or no if any liquid in it (about 10 minutes). Drain any remaining liquid from the pan and set it apart.
-
In a medium measurement bowl, beat the eggs with the half and half or milk till well-combined.
Assemble the quiche.
-
Line the underside of the parbaked pie crust with half of the grated cheese, then the cooked mushrooms and onions, adopted by the remaining cheese. Pour the milk and egg combination on prime.
Bake the quiche.
-
Place the pie plate within the middle of the preheated oven.
-
Bake for about 35 minutes, or till the quiche is usually set and frivolously golden brown on prime, with only a tiny little bit of jiggle within the middle when moved back and forth.
-
The quiche will end cooking when it’s faraway from the oven.
-
Take away the pan from the oven and place it on prime of a wire rack to chill for at the least 20 minutes or till set.
-
Slice into wedges and serve heat.
Notes
You may also use our additional flaky gluten free pie crust right here. Comply with the directions in that recipe via parbaking the crust, then end with the elements and directions right here.
Concerning the greens for the filling.
Mushrooms may be changed with 10 ounces broccoli or cauliflower florets, blanched and blotted dry, or 1 pound frozen reduce spinach, thawed and drained.
Concerning the half and half.
You can also make your personal half and half by combining half heavy whipping cream and half milk by quantity. Alternatively, you need to use 1 cup (8 fluid ounces) entire milk instead of the 1 1/3 cups half and half.
About leftovers.
Any leftovers may be lined and positioned within the fridge for at the least 3 days. Heat in a 200°F oven earlier than serving. They can be wrapped tightly and frozen for as much as 3 months, then defrosted within the fridge earlier than warming and serving.