

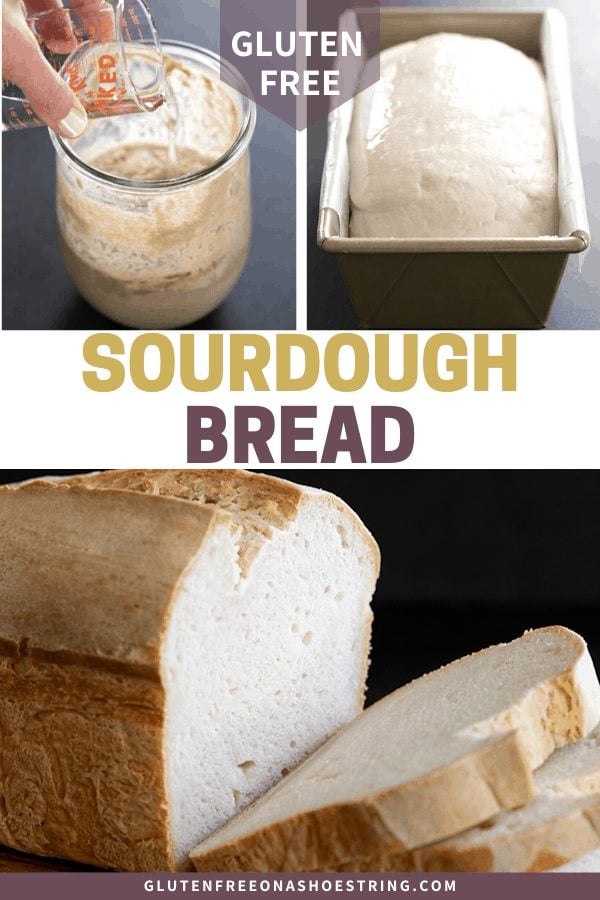
This flavorful loaf of gluten free sourdough bread is made with the best selfmade gluten free sourdough starter. As soon as your starter is prepared, you may make and bake your loaf the identical day!
After writing an entire ebook on gluten free bread baking, I simplified the sourdough course of right down to mixing the dough, letting it rise, and baking it in a couple of hours. There isn’t any sophisticated schedule to fret about, both.
my take
Nicole’s Recipe Notes
This gluten free sourdough recipe and our simplified gluten free sourdough starter are not a deep dive into all issues sourdough. As an alternative, we’re protecting it tremendous easy with a 2-ingredient starter, and a 7-ingredient bread (together with salt and sugar).
Consider it extra like a workhorse sort of white bread that is nice for lunches. In my bread ebook, GFOAS Bakes Bread, I’ve an entire chapter on wild yeast sourdough recipes and we go deep.
Right here, the principles are a bit of relaxed, the method takes much less work, and you continue to get a yeasty, tangy loaf of sourdough bread after a single day of baking (and about 20 minutes of lively time).
If in case you have business yeast readily available and also you want a loaf of bread right now, I like to recommend our easiest gluten free bread recipe. However for those who may be affected person, sourdough bread baking is definitely worth the time.
Skilled suggestions
- Preserve it easy. In the event you’ve been confused by sourdough starters up to now, stick to me. All that issues is that you need to use the correct elements mixed in the correct approach, and choose when the bread is risen sufficient for baking.
- What’s a starter? A sourdough starter is a fermented combination of flour and water that captures and cultivates yeast from the flour and the encompassing air. It is totally different from business yeast you purchase within the retailer, which is a single, remoted pressure of yeast.
- Do you have got a starter? In the event you’ve come right here from our gluten free sourdough starter recipe (a combination of gluten free flour and water), you are greater than midway there. If not, create your starter, then come again in 5 to 10 days.
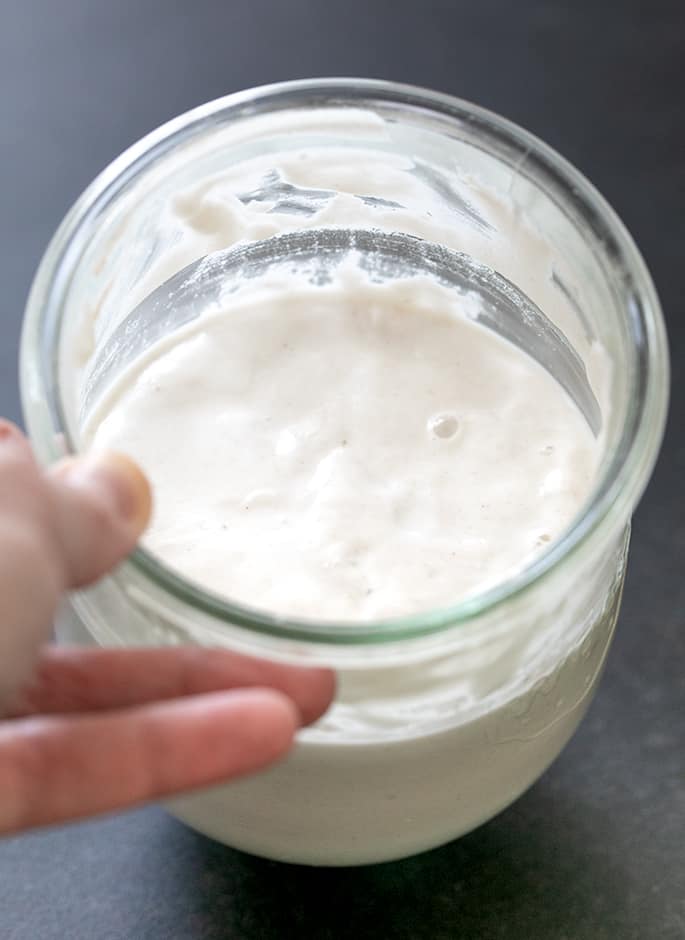
- Get your starter prepared to make use of. In case your starter is lively, however hasn’t been fed inside the final 8 to 10 hours, feed it first. Discard 1/3 of the quantity, combine in 4 fluid ounces spring or distilled water (faucet water has chlorine that would kill the yeast) and 70 grams gum-free gluten free flour or one other gluten free flour mix with out xanthan gum with a non-metal spoon or spatula, shut the lid loosely, and let it sit for about 2 hours or till effervescent once more.
Substances & substitutions
Sourdough starter
This recipe is written to make use of the flour and water sourdough starter recipe on this weblog, which is a really moist starter, with a a “hydration ratio” of 160%. For each 1 gram of flour, there are 1.6 grams of water.
To attempt making this recipe utilizing a distinct sourdough starter, it’s essential to rebalance the quantity of water to flour within the starter.
For instance, in case your starter has equal elements gluten free flour and water (a 100% hydration ratio), add some water (or extra milk) to extend the hydration. As an alternative of the 165 grams of starter known as for on this recipe, attempt 100 grams of that equal-parts water-and-flour-starter and 65 grams of water on this recipe.
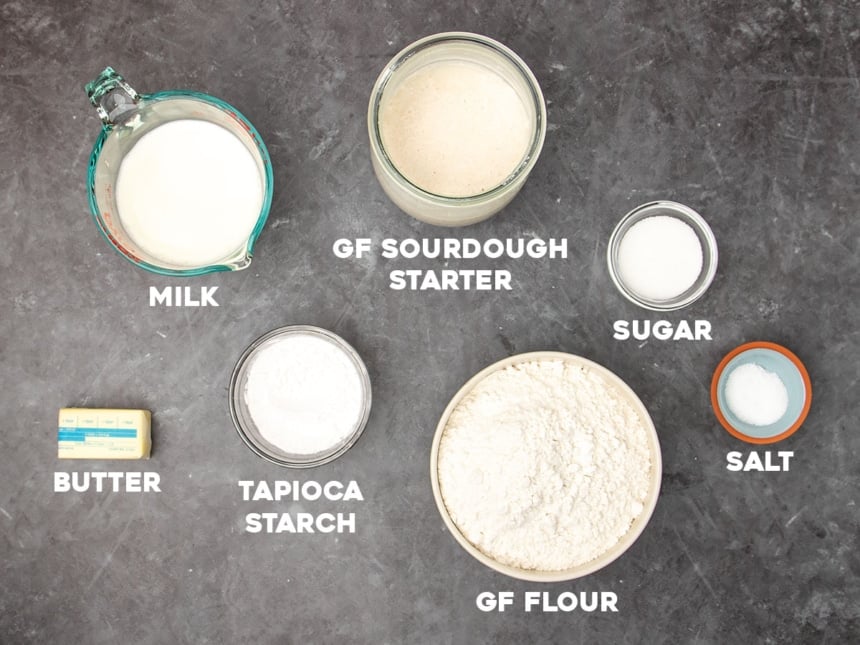
Dairy free
Milk and butter add richness and tenderness to the bread. In the event you’re dairy free, the milk may be changed with unsweetened and unflavored nondairy milk (my favourite is almond milk). For the butter, attempt a vegan butter various like Soften or Miyoko’s Creamery model or Earth Steadiness buttery sticks, not oil.
Tapioca starch/flour
All of my really useful all goal gluten free flour blends already comprise tapioca starch/flour as an ingredient. This bread rises a lot better and has a softer, extra tender crumb whenever you add extra tapioca starch to the loaf.
You may make the recipe with 3 1/2 cups (490 grams) all goal gluten free flour, although, however it’s a greater bread with 3 cups all goal and added tapioca starch.
instruments to make use of
Tools
- Digital kitchen scale: Measuring every little thing by weight, not by quantity, for the starter and every little thing else, will provide you with predictable outcomes the primary time, and each time. This easy Escali scale is nice; nothing fancy wanted.
- Stand mixer with paddle attachment: Making a clean dough that rises nicely works finest with a stand mixer with the paddle attachment. If you do not have one, you’ll be able to pulse the dough a couple of instances in a big meals processor (a plastic blade is good). You can too attempt mixing actually laborious by hand with a Danish dough whisk.
- Loaf pan: You do not want a elaborate Banetton basket for this loaf. A regular loaf pan works nice. You possibly can additionally bake this loaf in a sizzling Dutch oven for a crispier crust. Simply form the dough with moist palms right into a dome on a small piece of parchment paper, warmth the Dutch oven, place the loaf inside on the paper and bake.
The best way to make gluten free sourdough bread
Make the uncooked dough
As soon as your starter is prepared for baking, making the bread is fast and straightforward. Whisk collectively the dry elements within the bowl of a stand mixer (gluten free flour mix together with xanthan gum, add tapioca starch, some sugar and salt), add the moist elements (sourdough starter, milk, and butter), and beat with the paddle till very nicely mixed.
Let it rise, then bake
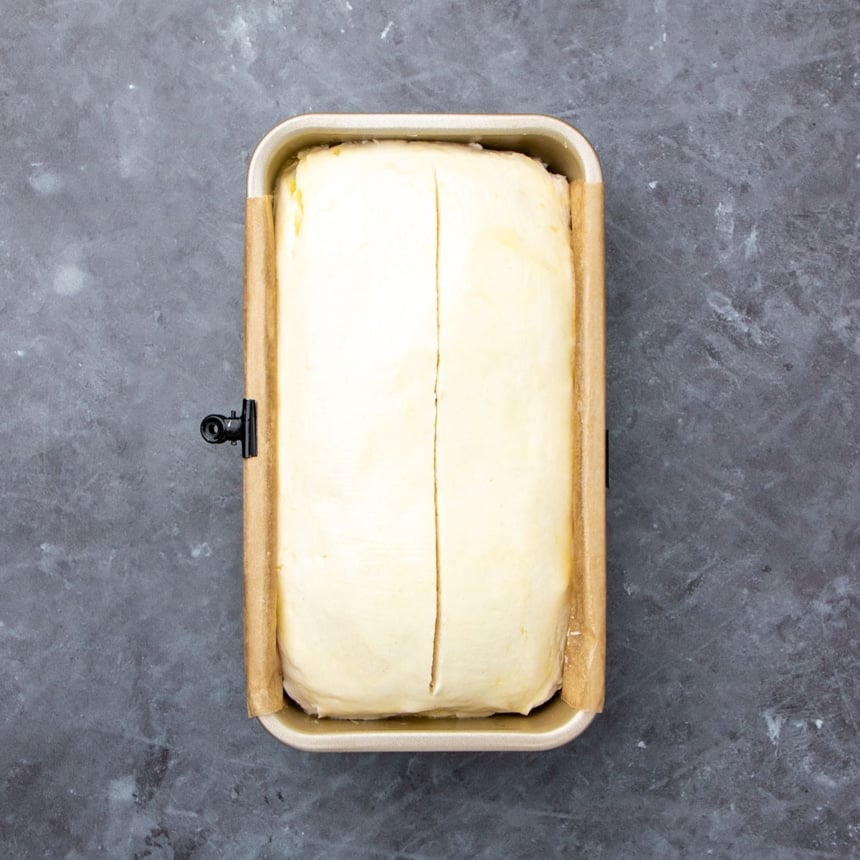
Switch the uncooked bread dough to a ready loaf pan, and clean the highest. Cowl and let rise till it is about 50% greater than when it began. It will not double, and rising will take at the least 3 hours, and as much as 6 hours or extra.
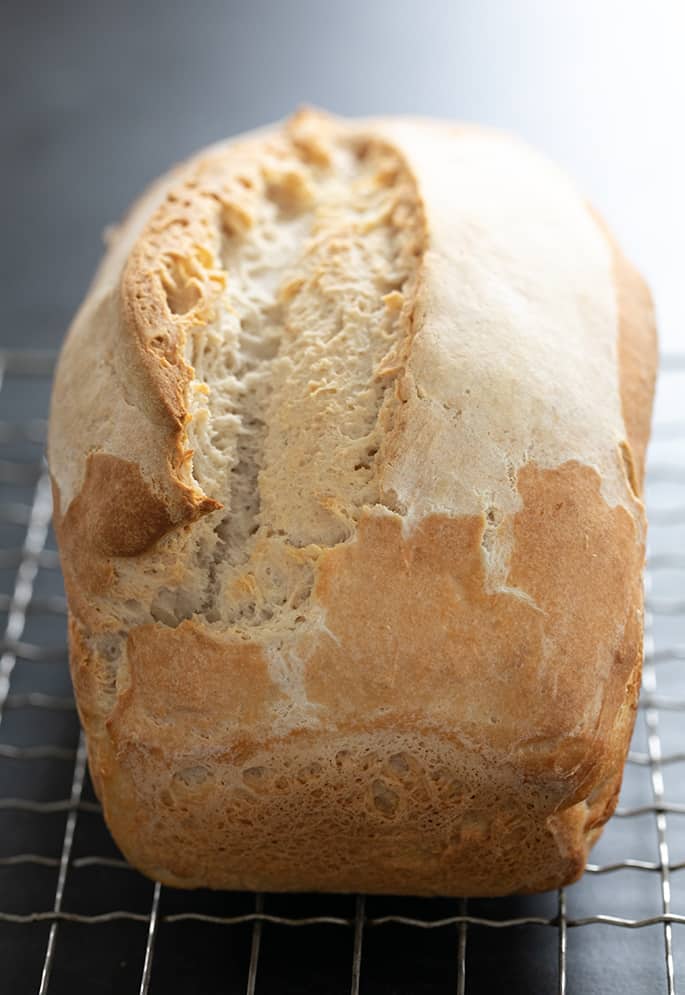
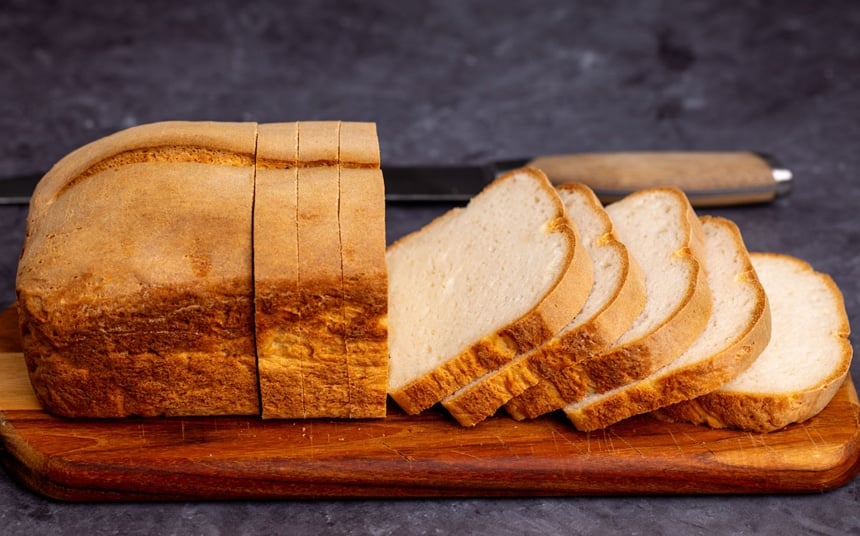
Lower a 1/4-inch deep slit down the center of the risen loaf and bake at 400°F for half-hour, then end baking at 350°F. The interior temperature shall be at the least 200°F when it is accomplished.

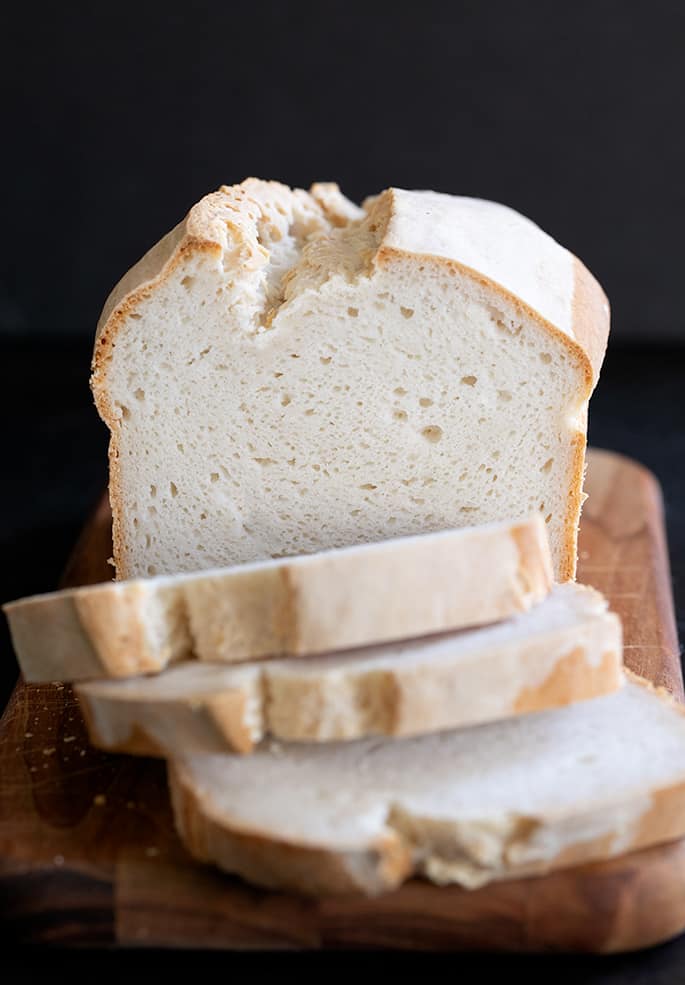
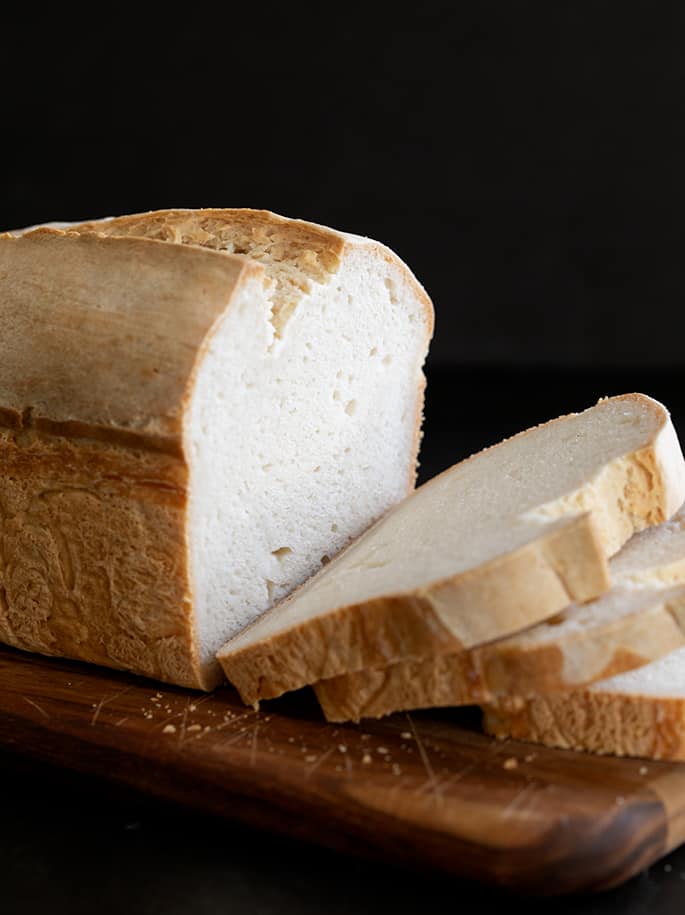
Let cool on a wire rack, then slice the loaf and serve!
- Stand mixer fitted with paddle attachment (or attempt pulsing in a meals processor)
Glass jar for starter with loose-fitting or fabric lid
Nonreactive (no steel) spoon or spatula silicone, plastic, wooden all work
Forestall your display from going darkish
Grease a typical 9-inch x 5-inch loaf pan and line with parchment paper. Set the pan apart.
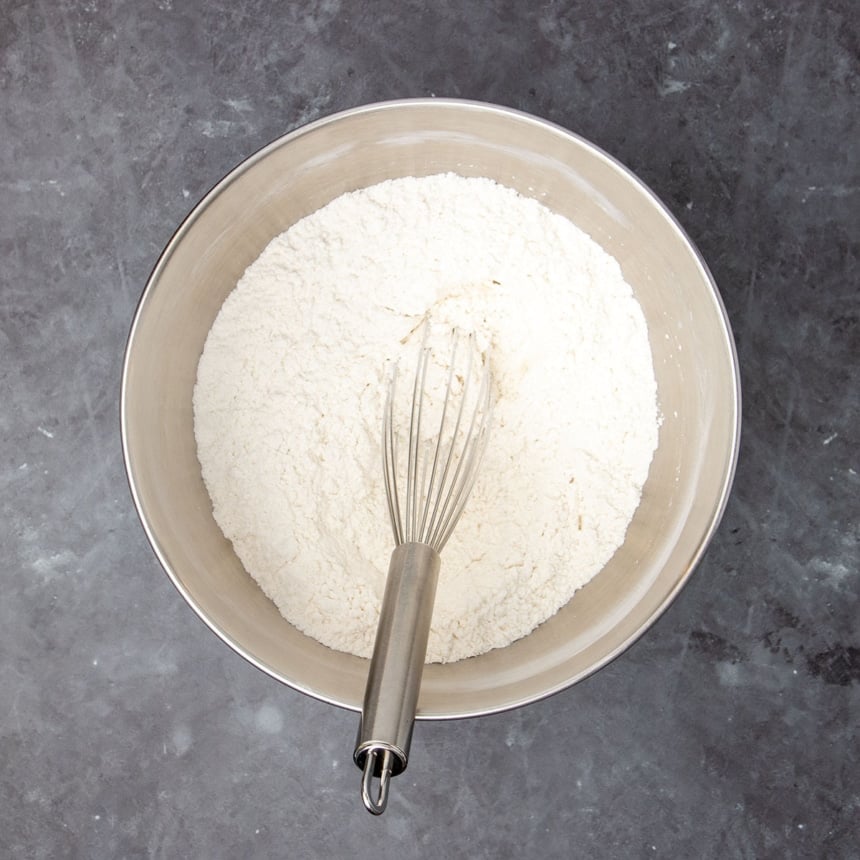
Within the bowl of a stand mixer fitted with the paddle attachment or a big bowl with a hand mixer fitted with dough hooks, place the all goal flour, xanthan gum, tapioca starch/flour, granulated sugar, and salt, and blend or whisk to mix nicely.
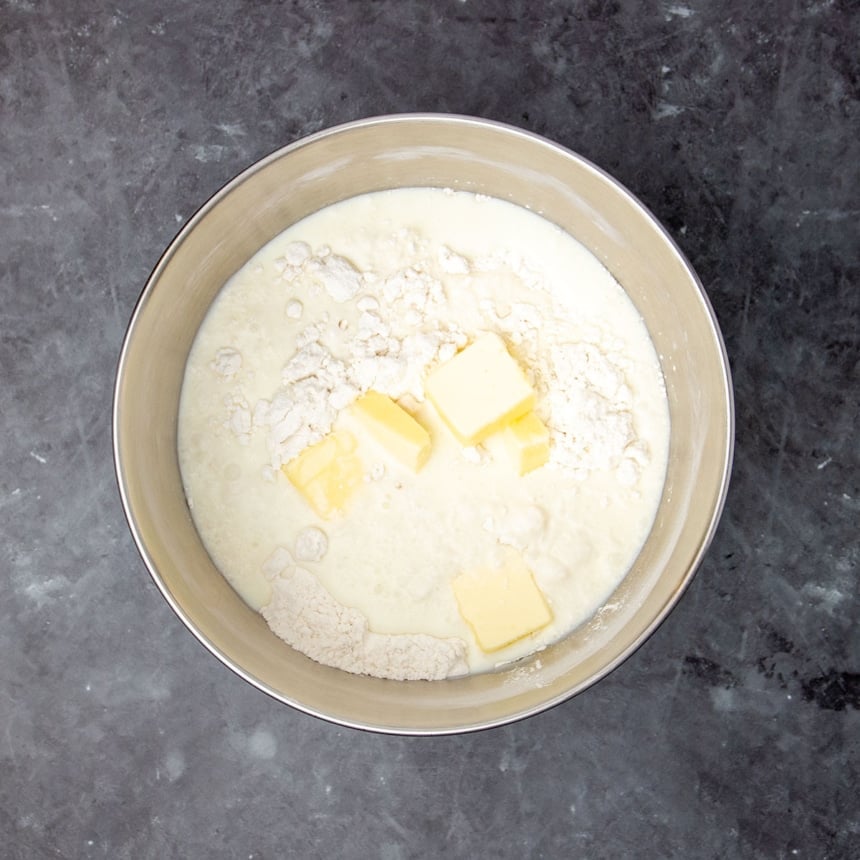
Add the starter, 1 1/2 cups of milk, and the butter, and beat on medium pace to mix. This can be a batter-style bread dough, so it gained’t resemble conventional bread dough, however reasonably a comfortable cookie dough.
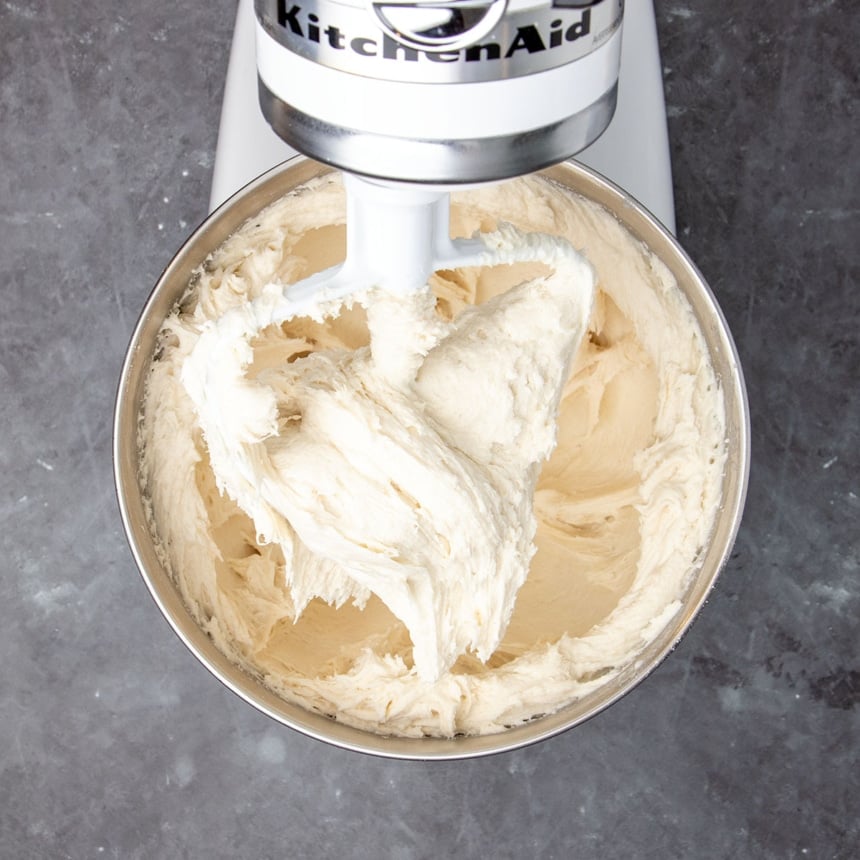
Flip the mixer as much as medium-high pace and beat till the dough has taken on a whipped look (about 5 minutes). The dough ought to be cheesy to the contact, however ought to maintain its form when scooped.
In case your dough feels in any respect dry to the contact, add extra milk by the tablespoon, beating it in till well-combined, till the dough reaches the correct consistency.
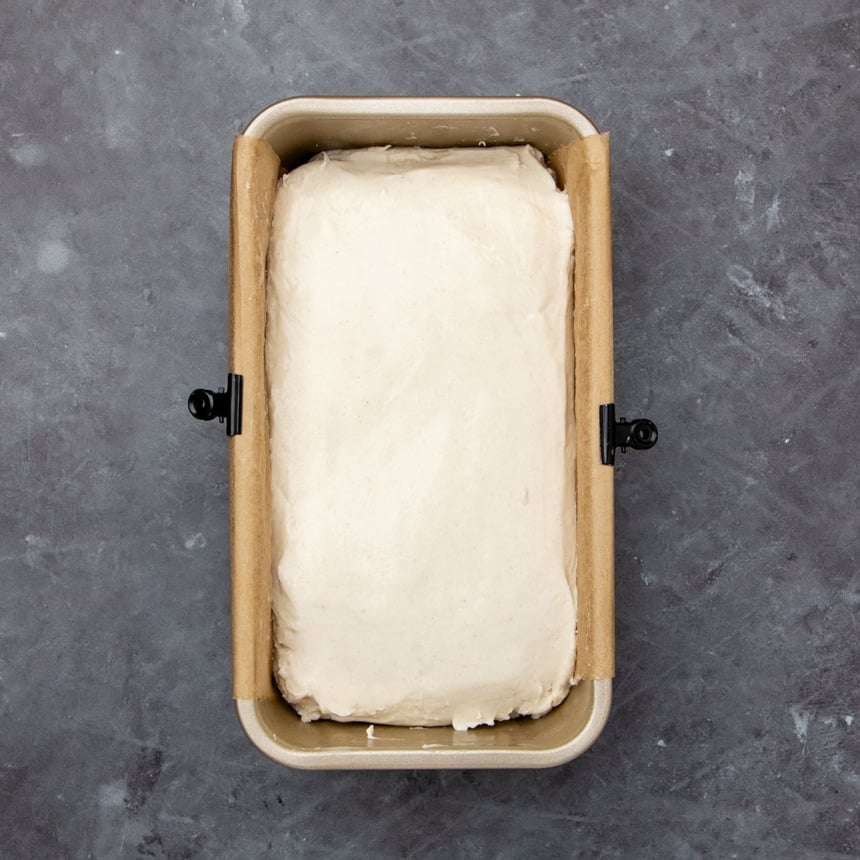
Switch the bread dough to the ready loaf pan. Utilizing a moistened spatula, press the dough into each nook of the loaf pan and unfold the highest into an excellent layer.
For a extra conventional loaf form, pile the dough a bit extra towards the middle in a dome.
Cowl the loaf pan with flippantly oiled plastic wrap and permit it to rise in a heat, draft-free place till it’s reached about 150% of its unique measurement, at the least 4 hours. It is not going to totally double in quantity, and can rise extra within the oven than it does uncooked.
Even conventional yeast bread dough will take longer to rise correctly in colder, drier climate and fewer time in hotter, extra humid climate.
This wild yeast sourdough bread will take longer to rise than every other, and can rely partially upon the age of your starter.
This bread dough is way much less more likely to overproof and tackle that pock-marked look than bread made with standard yeast. In the event you’re uncertain about whether or not the bread has proofed sufficient, enable it to maintain rising.
When the bread is nearing the top of its rise, preheat your oven to 400°F.
Take away the plastic wrap and, utilizing a pointy knife or lame, slash the highest of the loaf from one brief finish to the opposite about 1/4-inch deep.
Brush the highest of the risen loaf generously with melted butter earlier than baking as an elective step to assist the loaf in browning.
Place the pan within the heart of the preheated oven and permit to bake for half-hour.
Scale back the oven temp to 350°F, rotate the pan 180° round, and proceed to bake till heart of the loaf reads 200°F on an instantaneous learn thermometer (about half-hour extra).
The crust might not darken as a lot as you count on, however the loaf ought to sound hole when thumped shortly with a finger.
Take away the pan from the oven and permit the bread to chill for about 10 minutes within the pan earlier than transferring to a wire rack to chill utterly earlier than slicing and serving.
To freeze the bread, cool the loaf utterly, then slice, wrap tightly and freeze the slices. Defrost as many slices at a time as you want within the toaster.
- Discard 1/3 of the quantity
- Combine in 4 fluid ounces spring or distilled water and 70 grams gum-free gluten free flour or one other gluten free flour mix with out xanthan gum (Nicole’s Greatest works nice) with a non-metal spoon or spatula.
- Shut the lid loosely
- Let it sit for about 2 hours or till effervescent once more
Serving: 1slice | Energy: 265kcal | Carbohydrates: 48g | Protein: 3g | Fats: 6g | Saturated Fats: 4g | Polyunsaturated Fats: 0.2g | Monounsaturated Fats: 1g | Trans Fats: 0.2g | Ldl cholesterol: 16mg | Sodium: 412mg | Potassium: 61mg | Fiber: 2g | Sugar: 4g | Vitamin A: 199IU | Calcium: 47mg | Iron: 0.1mg
Diet info is routinely calculated, so ought to solely be used as an approximation.
FAQs
This recipe is for a batter-style bread, not our bread recipes that decision for the extra complicated gluten free bread flour so it has just one rise. It produces an on a regular basis, however flavorful loaf of bread with a crisp crust and a comfortable crumb.
This rise takes fairly a little bit of time. In all of my recipe testing, I am but to see an increase that took lower than 3 hours, and have even let it rise for 8 hours with out overproofing.
In the event you’re uncertain about whether or not or not the bread has proofed sufficient, enable it to maintain rising.
The dough ought to rise to about 150% of its unique measurement when it is accomplished proofing. That signifies that it ought to be 50% greater than when it began. In contrast to standard bread, this loaf is not going to double in measurement, or rise to 200% its unique measurement.
Sure, since this recipe rises so slowly with out overproofing, you may make the dough earlier than bedtime, form it within the loaf pan, cowl the pan, and set it to rise throughout the night time. Once you get up, bake the loaf and revel in. You can too begin the method within the morning, let it rise and bake about an hour earlier than dinnertime.
Attempt utilizing 20 grams of psyllium husk powder as a substitute of including xanthan gum and as a substitute of an all goal gluten free flour with xanthan gum already added.
Sure. All yeast bread takes longer to rise in cool, dry environments than in moist, moist environments, however it would rise. Simply ensure you’ve got coated the dough because it rises so it would not dry out, and be affected person whereas it rises, nonetheless lengthy it takes.
Sure, the sugar helps feed the yeast. As an alternative of utilizing granulated sugar, you need to use half as a lot honey, although, for those who choose.
make forward/leftovers
Storage directions
Contemporary selfmade bread is at all times finest the day it is baked. As soon as cool, you’ll be able to wrap this loaf tightly in plastic wrap and it’ll keep contemporary at room temperature for 1 to 2 days.
For longer storage, you’ll be able to wrap it tightly unsliced, or slice it and place it in a freezer-safe Ziploc bag and freeze the bread for as much as 2 months. Take away as a lot air as potential from the bag, since air creates freezer burn. Defrost the entire loaf to slice if unsliced, or defrost by the slice within the toaster oven.
Refresh bread that is begun to go stale by sprinkling it with lukewarm water and baking in a 300°F oven for about 10 minutes. It would style contemporary because the day it was baked.